HP Sprocket Studio - Improving Print Quality

This document is for HP Sprocket Studio and the HP sprocket app.
The quality of a printed photo is not as expected. Resolve the following print quality problems.
  • Dark, light, faded, or blurry areas
  • Lines or streaks
  • Individual color on the edges of the photo

Step 1: Check the photo paper

Remove the photo paper from the paper tray, and then check it for any quality issues.
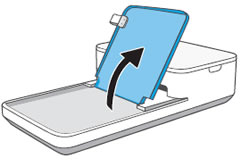
  1. Open the paper tray cover.
    Opening the paper tray cover
  2. Remove the photo paper from the paper tray.
  3. Check the photo paper for any quality issues.
    • Paper is compatible: Use genuine 100 x 148 mm (4 x 6 in) HP Sprocket Studio photo paper.
        caution:
      Do not use standard photo paper. It can damage the printer and cartridge.
    • Paper has dirt or fingerprints on the glossy side: Carefully wipe the surface clean with a microfiber cloth, and then add it back to the stack.
    • Paper is wrinkled, bent, or torn: Discard it from the stack.
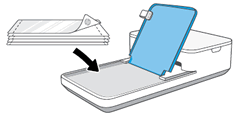
  4. Hold the photo paper by its sides, and then reload it into the paper tray with the HP logos facing down.
    Loading paper into the input tray
  5. Close the paper tray cover, and then send a print job.
If the print quality is still unacceptable, continue to the next step.

Step 2: Upgrade the Sprocket firmware

HP regularly releases firmware updates. Upgrading the firmware might resolve the issue.
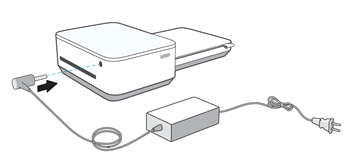
  1. If you are using the optional HP Sprocket Studio Power Bank, disconnect it, and then connect the power cord to your printer and a wall outlet.
    Connecting the power cord to the printer
  2. Turn on the printer, and then make sure your mobile device is connected to the Internet.
  3. On your mobile device, open the HP sprocket app.
  4. Tap the Menu icon , and then tap sprocket.
  5. Tap Manage Printers, make sure your Sprocket is selected, and then tap Printer Settings.
  6. In Printer Settings, look for a firmware upgrade.
    • If a firmware upgrade displays, tap Get Firmware Upgrade, follow the on-screen prompts to complete the update, and then send a print job. If the print quality is still unacceptable, continue to the next step.
    • If a firmware upgrade option does not display, the firmware is up-to-date. Continue to the next step.

Step 3: Other things to try

The following tips might help improve print quality.
  • Make sure the lighting is sufficient to clearly see the subject of your photo. Use the flash on your mobile device to improve the photo quality.
  • Make sure images have a minimum resolution of 1836 x 1224 pixels per inch (ppi). Screen-captured images from your mobile device might not have sufficient resolution for optimal print quality.
  • Use the HP sprocket appAutofixfeature. On the print preview screen, tap Edit or the Edit icon , and then tap the Autofix wand or . The app adjusts the photo automatically. Tap the Checkmark to save the changes, and then tap the Print icon .
  • Use the HP sprocket app to adjust photo contrast and brightness. On the print preview screen, tap Edit or the Edit icon , and then tap the Adjustments icon . Adjust the brightness and contrast, tap the Checkmark to save any changes, and then tap the Print icon .
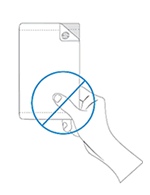
  • Avoid touching the glossy side of the photo paper. When handling the HP Sprocket Studio photo paper, make sure to hold it by the edges or perforated tabs. Touching the glossy side can leave fingerprints and other smudges, which can affect print quality.
    Example of touching the glossy side of the paper
  • Do not leave the paper tray cover open. If the paper tray cover is open for extended periods of time, dirt can accumulate on the glossy surface.
  • Store the photo paper in a cool, dry place and avoid contact with water. If water spills on the photo paper, wipe it away as soon as possible to prevent damaging the photo paper.

Use asterisk (*) to hide/show help panel
Use numbers to navigate
1
Command Legend
General
Accessibility
Basic Commands
CommandExplanation
Go Say "focus" and then the name of the text of the desired element.
Scroll Say "scroll" and then "down" or "up" (e.g. : "Scroll down").
Click Say "click" to activate the link or button that is focused.
Mute Say "mute" to mute the voice recognition ("Muted" state).
Stop Say "stop" to turn off the Voice Command function.
CommandExplanation
Text Say "run text reader" to run the function.
Smart Navigation Say "run smart navigation" to run the function.
Keyboard Say "run keyboard navigation" to run the function.
Highlight Say "run highlight links" to run the function.
Highlight Say "run highlight headers" to run the function.
Large Black Cursor Say "run large black cursor" to run the function.
Large White Cursor Say "run large white cursor" to run the function.
Reading Guide Say "run reading guide" to run the function.
Stop Animations Say "run stop animations" to run the function.
Magnifier Say "run magnifier" to run the function.
Hide Images Say "run hide images" to run the function.
Monochrome Say "run monochrome" to run the function.
Increase Font Size Say "run increase font size" to run the function.
Decrease Font Size Say "run decrease font size" to run the function.
Font Say "run readable font" to run the function.
High Contrast Say "run high contrast" to run the function.
Dark Contrast Say "run dark contrast" to run the function.
Reset Say "run reset" to clear all the selected features except for the voice command.
CommandExplanation
Delete Say "input delete" to delete the last written word in the field content.
Move the Cursor Say "input move cursor" to move the cursor to the start of the text element.
Space () Say "input space" to add space to your text content
Tab () Say "input tab" to add tab to your text content
At sign @ Say "input at sign" to add @ to your text content
Period . Say "input period" to add period to your text content
Question Mark ? Say "input question mark" to add question mark to your text content
Exclamation ! Say "input exclamation" to add exclamation point to your text content
Pound Sign # Say "input pound sign/hashtag/number sign" to add # to your text content
Plus Sign + Say "input plus sign" to add plus sign to your text content