This document is for HP Sprocket 200 Printers and the HP sprocket app.
Remove the printer from the box, and then download the HP sprocket app to finish setting up the printer.
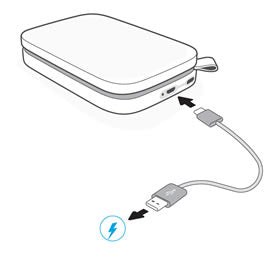
Step 1: Unbox and charge the printer
Unbox the printer, and then charge it before using it.
-
Remove the printer from the box, and then remove any packing material and tape from the printer.
-
Connect the USB cable to the printer and a USB power supply.
-
Charge the printer for 30 minutes or until the Charging Indicator light turns green.
Step 2: Pair the printer and mobile device
Install the HP sprocket app on your mobile device, and then pair your mobile device to the printer using a Bluetooth connection. The app is required to connect the printer and print photos from your mobile device.
-
Go to the
HP Sprocket (in English) homepage, and then follow the on-screen instructions to download and install the app.
-
After the app installs, turn on the printer by holding the Power button until the Status Indicator light above the output slot is on.
-
On your mobile device, open the Bluetooth settings menu, and then make sure Bluetooth is enabled.
-
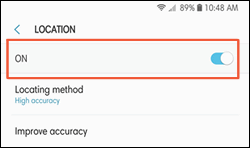
Android devices: On your mobile device, open the Location or Location Services menu, and then make sure the setting is turned on.
OPMERKING :
HP does not track your location or keep a record of your location information. You can turn the setting off when you are not using the printer.
-
Open the HP sprocket app.
-
If a Welcome screen displays, tap the setup option, and then follow the on-screen instructions.
-
Tap the
Menu icon

, tap
sprocket, and then tap
Manage Printers.
A list of available Sprockets displays.
-
If your printer displays, the printer is connected.
-
If your printer does not display, tap Add New Printer, tap your printer, and then follow the on-screen prompts.
Step 3: Check for a firmware upgrade
Open the HP sprocket app, and then look for a printer firmware upgrade.
-
Make sure the Sprocket is on and your mobile device is connected to the Internet.
-
On your mobile device, open the HP sprocket app.
-
Tap the
Menu icon
, and then tap
sprocket.
-
Tap Manage Printers, make sure your Sprocket is selected, and then tap Printer Settings.
-
Under the Status section, locate Battery.
-
If the battery charge is 25% or higher, continue with these steps.
-
If the battery charge is 24% or lower, charge the battery for at least 30 minutes, and then continue with these steps.
-
In Printer Settings, look for a firmware upgrade.
-
If a firmware upgrade displays, tap Get Firmware Upgrade, and then follow the on-screen prompts to complete the update.
-
If a firmware upgrade option does not display, the firmware is up-to-date.
Step 4: Load HP Sprocket Photo Paper
Load 5.0 x 7.6 cm (2 x 3 in) HP ZINK Sprocket Photo Paper into the input tray.
-
Remove the paper cover by pulling it straight up, and then set it aside.
-
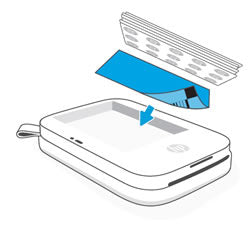
Load up to 10 sheets of photo paper with the blue Print Quality Card (formerly Smartsheet). Make sure the blue card is on the bottom of the stack with the barcode facing down, and the photo paper is loaded with the HP logos facing down.
OPMERKING :
Keep the blue card until you are done with all 10 sheets, and then discard it.
-
Replace the paper cover.
The printer automatically calibrates with the blue card.
Step 5: Print a photo
Send a print job with the HP sprocket app.
-
From the home screen, swipe left or right to select a photo saved to your mobile device, Facebook, Instagram, or Google account.
-
On the preview screen, tap
Edit or the
Edit icon

to adjust the photo appearance, add frames and stickers, or apply filters, and then tap the
Checkmark
when you are done.
-
Tap the
Print icon

.

 Diagnostic
 , tap sprocket, and then tap Manage Printers.
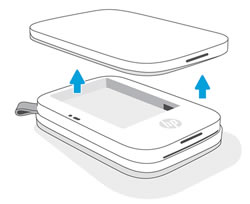
 to adjust the photo appearance, add frames and stickers, or apply filters, and then tap the Checkmark
 when you are done.
 .
.


