
 Diagnostic
There are 0 items in your cart
View all items >Sub-totalbefore tax & fees
$0.00
 , and then tap sprocket.
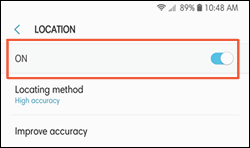
OPMERKING :You can turn location permission on to connect and print, and then turn it off when you are not using the Sprocket.
 , tap sprocket, and then tap
Manage Printers.
, tap sprocket, and then tap
Manage Printers.
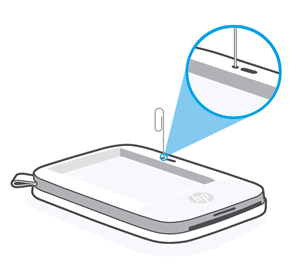
OPMERKING :The location of the Reset button varies by Sprocket model. Typically, the button is located underneath the Paper Cover, but can also be found on the outside next to the charging port.
HP Sprocket
© Copyright 2024 C&A Marketing, Inc. is the manufacturer of the HP® Sprocket®, under license from HP, Inc. HP and Sprocket trademarks are owned by HP Inc. or its affiliates. ZINK® Technology and ZINK® Trademarks are owned by ZINK Holdings LLC., used under license.


