HP Sprocket Studio - Printer Does Not Connect or Print

This document is for HP Sprocket Studio and the HP sprocket app.
After sending a print job, the printer does not connect or print.

Step 1: Turn on the printer

The printer might have automatically turned off. Make sure 10 cm x 15 cm (4 in x 6 in) HP Sprocket Studio photo paper is loaded into the paper tray with the HP logos facing down, and then turn the printer on.
  • If the printer connects or prints, continue to the next step to change the Auto Off setting.
  • If the printer does not connect or print, try connecting and printing again. If the issue persists, skip to the Check the power connection step.

Step 2: Change the Auto Off setting

From the HP sprocket app, change when the printer automatically turns off.
  1. On your mobile device, open the HP sprocket app.
  2. Tap the Menu icon , and then tap sprocket.
  3. Tap Manage Printers, make sure your printer is selected, and then tap Printer Settings.
  4. Under Settings, tap Auto Off, and then select the desired setting.
If the issue persists, continue to the next step.

Step 3: Check the power connection

The printer might not be getting enough power. Check the connection of the power cord or HP Sprocket Studio Power Bank (optional).
  • If you are using the power cord that came with the printer, disconnect it from the printer and wall outlet, and then wait 30 seconds to reset the printer and clear any internal errors. Check the power cord to make sure it is securely connected to the power adapter. Reconnect the power cord to the printer and wall outlet, and then turn on the printer.
    note:
    Connect the power cord directly to a wall outlet. Connecting to a power strip might not provide enough power.
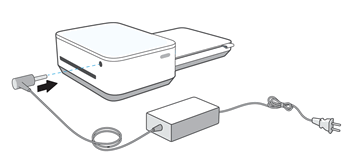
    Making sure the power cord is connected
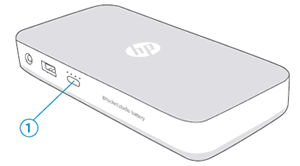
  • If you are using the power bank, connect the power cord to the power bank to continue printing. After you are done printing, disconnect the power bank from the printer, and then charge it until all four Charge Status lights are white.
      Location of the Charge Status button on the HP Sprocket Studio Power Bank
    1. Charge Status button and lights
If the issue persists, continue to the next step.

Step 4: Check your mobile device settings

The required mobile device settings might not be enabled to connect and print. Check the settings, and then use the HP sprocket app to confirm the printer is connected.
  1. Make sure your mobile device is near the printer. Bluetooth signals can weaken with distance.
  2. On your mobile device, open the Bluetooth settings menu, and then make sure Bluetooth is enabled.
  3. Android devices: On your mobile device, open the Location or Location Services menu, and then make sure the setting is turned on.
    note:
    You can turn location permission on to connect and print, and then turn it off when you are not using the printer.
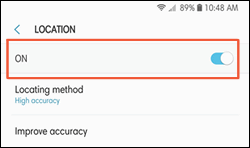
    Location menu example on Android
  4. On your mobile device, open the HP sprocket app.
  5. Tap the Menu icon , tap sprocket, and then tap Manage Printers.
    • If your printer displays, the printer is connected.
    • If your printer does not display, tap Add New Printer, and then tap the name of your printer.
If the issue persists, continue to the next step.

Step 5: Upgrade the printer firmware

HP regularly releases firmware updates. Upgrading the printer firmware might resolve the issue.
  1. If you are using the optional HP Sprocket Studio Power Bank, disconnect it, and then connect the power cord to your printer and a wall outlet.
    Connecting the power cord to the printer
  2. Turn on the printer, and then make sure your mobile device is connected to the Internet.
  3. On your mobile device, open the HP sprocket app.
  4. Tap the Menu icon , and then tap sprocket.
  5. Tap Manage Printers, make sure your Sprocket is selected, and then tap Printer Settings.
  6. In Printer Settings, look for a firmware upgrade.
    • If a firmware upgrade displays, tap Get Firmware Upgrade, follow the on-screen prompts to complete the update. If the issue persists, continue to the next step.
    • If a firmware upgrade option does not display, the firmware is up-to-date. Continue to the next step.

Step 6: Contact HP Customer Support

If you completed all preceding steps and issue has not resolved, contact HP Customer Support.
Double-click to edit...

Use asterisk (*) to hide/show help panel
Use numbers to navigate
1
Command Legend
General
Accessibility
Basic Commands
CommandExplanation
Go Say "focus" and then the name of the text of the desired element.
Scroll Say "scroll" and then "down" or "up" (e.g. : "Scroll down").
Click Say "click" to activate the link or button that is focused.
Mute Say "mute" to mute the voice recognition ("Muted" state).
Stop Say "stop" to turn off the Voice Command function.
CommandExplanation
Text Say "run text reader" to run the function.
Smart Navigation Say "run smart navigation" to run the function.
Keyboard Say "run keyboard navigation" to run the function.
Highlight Say "run highlight links" to run the function.
Highlight Say "run highlight headers" to run the function.
Large Black Cursor Say "run large black cursor" to run the function.
Large White Cursor Say "run large white cursor" to run the function.
Reading Guide Say "run reading guide" to run the function.
Stop Animations Say "run stop animations" to run the function.
Magnifier Say "run magnifier" to run the function.
Hide Images Say "run hide images" to run the function.
Monochrome Say "run monochrome" to run the function.
Increase Font Size Say "run increase font size" to run the function.
Decrease Font Size Say "run decrease font size" to run the function.
Font Say "run readable font" to run the function.
High Contrast Say "run high contrast" to run the function.
Dark Contrast Say "run dark contrast" to run the function.
Reset Say "run reset" to clear all the selected features except for the voice command.
CommandExplanation
Delete Say "input delete" to delete the last written word in the field content.
Move the Cursor Say "input move cursor" to move the cursor to the start of the text element.
Space () Say "input space" to add space to your text content
Tab () Say "input tab" to add tab to your text content
At sign @ Say "input at sign" to add @ to your text content
Period . Say "input period" to add period to your text content
Question Mark ? Say "input question mark" to add question mark to your text content
Exclamation ! Say "input exclamation" to add exclamation point to your text content
Pound Sign # Say "input pound sign/hashtag/number sign" to add # to your text content
Plus Sign + Say "input plus sign" to add plus sign to your text content