Υποστήριξη πελατών HP - Γνωσιακή βάση δεδομένων
HP Sprocket 200 Printers - Sprocket Does Not Connect or Print
This document is for HP Sprocket printers and the HP sprocket app.
After sending a print job to your Sprocket, the print job does not print. Make sure the Sprocket is charged, connected to your mobile device over a Bluetooth connection, and the Sprocket firmware is up-to-date.
Step 1: Turn on the Sprocket and check battery status
The Sprocket might have turned off or the battery might need to be charged. Use the HP sprocket app to check the battery status, and then adjust the Auto Off setting.
-
Press and hold the Power button to turn on the Sprocket, and then open the HP sprocket app.
-
Tap the Menu icon , and then tap sprocket.
-
Tap Manage Printers, make sure your Sprocket is selected, and then tap Printer Settings.
-
Under the Status section, locate Battery.
-
If the battery charge is 25% or higher, continue with these steps.
-
If the battery charge is 24% or lower, charge the battery for 30 minutes, and then continue with these steps.
-
-
Tap Auto Off to change when the Sprocket turns off, if necessary.
If the issue persists, continue to the next step.
Step 2: Make sure the Sprocket has photo paper in the input tray
Check the input tray and make sure photo paper is loaded.
-
Turn off the Sprocket, and then remove the paper cover.
-
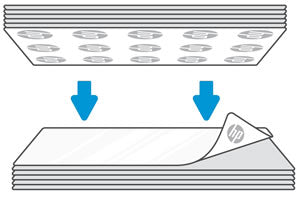
Make sure to load Sprocket Photo Paper, up to 10 sheets, with the HP logos facing down.
-
Replace the paper cover, and then turn on the Sprocket.
If the issue persists, continue to the next step.
Step 3: Confirm mobile device settings
Make sure your mobile device settings allow a connection with your Sprocket.
-
Turn on the Sprocket.
-
On your mobile device, open the Bluetooth settings menu, and then make sure Bluetooth is enabled.
-
Check the settings on your Android or iOS device.
-
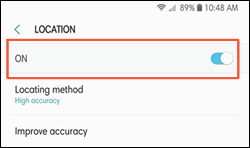
Android devices: On your mobile device, open the Location or Location Services menu, and then make sure the setting is turned on.
ΣΗΜΕΙΩΣΗ :
You can turn location permission on to connect and print, and then turn it off when you are not using the Sprocket. -
iOS devices: Previously paired Bluetooth accessories such as Apple AirPods might interfere with the initial discovery of the Sprocket. Unpair the accessory from the Bluetooth menu of your device before initial pairing with your Sprocket. The accessory can then be paired again after the Sprocket is connected.
-
-
On your mobile device, open the HP sprocket app.
-
Tap the Menu icon , tap sprocket, and then tap Manage Printers.A list of available Sprockets displays.
-
If your Sprocket displays: The Sprocket is connected.
-
If your Sprocket does not display: Tap Add New Printer, and then tap the name of your Sprocket.
-
If the issue persists, continue to the next step.
Step 4: Reset your mobile device and Sprocket
Reset your mobile device and Sprocket to clear any errors states.
-
Turn off your mobile device, and then turn it back on.
-
Turn on the Sprocket.
-
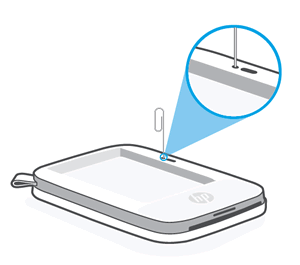
Remove the Paper Cover, and then use a narrow object, such as a pen or paperclip, to press and hold the Reset button for 3 seconds until the Sprocket turns off.
ΣΗΜΕΙΩΣΗ :
The location of the Reset button varies by Sprocket model. Typically, the button is located underneath the Paper Cover, but can also be found on the outside next to the charging port.Example of resetting the HP Sprocket Select Photo Printer -
Turn on the Sprocket.
If the issue persists, continue to the next step.
Step 5: Upgrade the Sprocket firmware
HP regularly releases firmware updates. Upgrading the Sprocket firmware might resolve the issue.
-
Make sure the Sprocket is on and your mobile device is connected to the Internet.
-
On your mobile device, open the HP sprocket app.
-
Tap the Menu icon , and then tap sprocket.
-
Tap Manage Printers, make sure your Sprocket is selected, and then tap Printer Settings.
-
Look for a firmware upgrade.
-
If a firmware upgrade displays, tap Get Firmware Upgrade, and then follow the on-screen prompts to complete the update.
-
If a firmware upgrade option does not display, the firmware is up-to-date.
-
If the issue persists, continue to the next step.
Step 6: Contact Customer Support
If you completed all preceding steps and issue has not resolved, contact Customer Support.
Βοηθήστε μας να βελτιώσουμε τις υπηρεσίες μας παρέχοντας σχόλια σχετικά με την εμπειρία σας από το συγκεκριμένο έγγραφο.